1. 登录过程中,密码两次MD5加密
1.1 为啥用两次MD5哇?
- 第一次MD5,是针对
传输安全做的MD5加密,因为http是明文传递,如果不进行加密的话,密码就直接被劫持了。
(Password1 = MD5(inputPassword,固定的salt值),salt为字符串)
- 第二次MD5,是针对
数据库安全做的MD5加密,保证数据库的防盗安全。若不进行二次加密,MD5值经数据库获取,可直接被MD5转换器直接转换为用户密码,不安全。
(Password2 = MD5(Password1,随机的salt值))
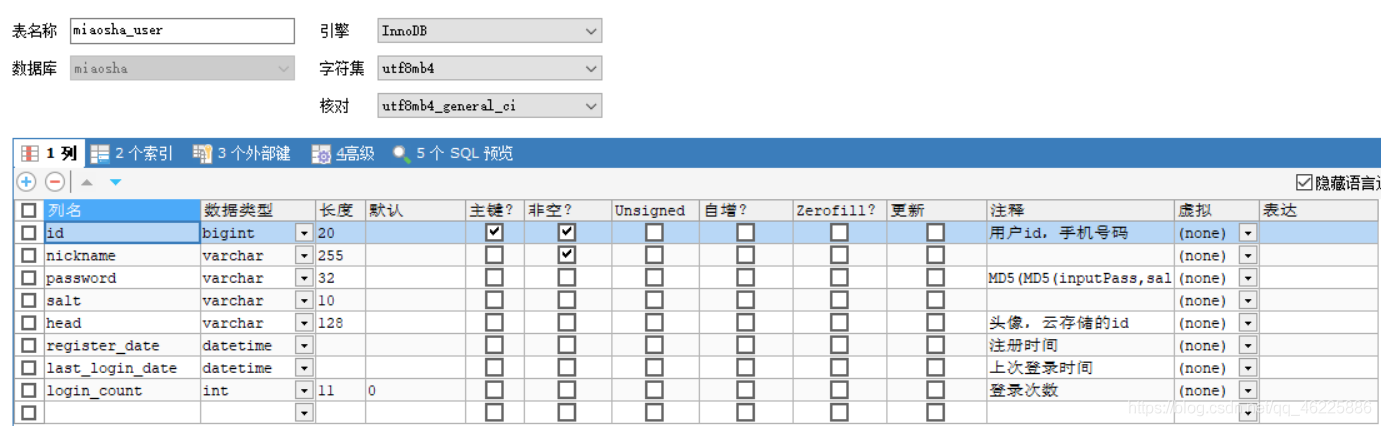
2. 构建数据库表
![在这里插入图片描述]()
2.1 几个需要注意的点
- 字符集采用的是
utf8mb4(most bytes 4)。简单来说,utf8mb4是utf8的超集,能够用4个字节存储更多的字符。标准UTF-8字符集编码可以用1~4个字节取编码21位字符,但是在MySQL中,utf8最多使用3个字节,像一些表情emoji和不常用的字符如“墅”需要用4个字节才能表示出来。用utf8mb4能解决以上问题。
- 数据库中存储了
"动态"salt值
3. 针对MD5加密功能,封装了专用工具类
以下MD5包的Maven依赖了解以下
1
2
3
4
5
6
7
8
9
10
| <dependency>
<groupId>commons-codec</groupId>
<artifactId>commons-codec</artifactId>
</dependency>
<dependency>
<groupId>org.apache.commons</groupId>
<artifactId>commons-lang3</artifactId>
<version>3.6</version>
</dependency>
123456789
|
3.1 工具类代码
1
2
3
4
5
6
7
8
9
10
11
12
13
14
15
16
17
18
19
20
21
22
23
24
25
| public class MD5Util {
private static final String salt = "1a2b3c4d";
private static String md5(String src){
return DigestUtils.md5Hex(src);
}
public static String inputPassToFormPass(String inputPass){
String pass ="" + salt.charAt(1) + salt.charAt(7) + inputPass
+ salt.charAt(3) + salt.charAt(5);
return md5(pass);
}
...
}
123456789101112131415161718192021222324
|
- 我在第一次处理加密时,拼接
字符时没有添加"",出现了登录验证失败的问题
4. 加入JSR参数校验
4.1 JSR参数校验
- 我们看如下,代码,在登录处理过程中,我们要用
代码实现对前端传过来的id和password进行校验(我们这里是验证非空),引入JSR参数校验之后,能够将这些代码省去
1
2
3
4
5
6
7
8
9
10
11
12
13
14
15
16
17
18
19
20
21
22
23
| @PostMapping("/do_login")
@ResponseBody
public Result<Boolean> doLogin(LoginVo loginVo){
log.info(loginVo.toString());
String mobile = loginVo.getMobile();
String password = loginVo.getPassword();
if(StringUtils.isEmpty(password)){
return Result.error(CodeMsg.PASSWORD_EMPTY);
}
if(! ValidatorUtil.isMobile(mobile)){
return Result.error(CodeMsg.MOBILE_ERROR);
}
CodeMsg msg = miaoShaUserService.login(loginVo);
if(msg.getCode() == 0){
return Result.success(true);
}else {
return Result.error(msg);
}
}
12345678910111213141516171819202122
|
我们先看一下导入的包
1
2
3
4
5
| <dependency>
<groupId>org.springframework.boot</groupId>
<artifactId>spring-boot-starter-validation</artifactId>
</dependency>
1234
|
我们在doLogin()方法上,加上JSR验证,@Valid注解
1
2
| public Result<CodeMsg> doLogin(@Valid LoginVo loginVo)
1
|
被标注的参数,我们进入它的实现类中,对其中的字段进行约束,如下(@NotNull,@Length,@IsMobile,其中@IsMobile是我们自定义的注解)
1
2
3
4
5
6
7
8
9
10
11
12
| @Data
public class LoginVo {
@IsMobile
@NotNull
private String mobile;
@NotNull
@Length(min = 32)
private String password;
}
1234567891011
|
4.2 @IsMobile自定义注解
我们看一下它的代码(这个注解的写法,根据已有注解@NotNull,仿写而来),它实现的是对手机号码的验证
1
2
3
4
5
6
7
8
9
10
11
12
13
14
15
16
17
18
19
| @Target({ElementType.FIELD, ElementType.ANNOTATION_TYPE, ElementType.CONSTRUCTOR, ElementType.PARAMETER})
@Retention(RetentionPolicy.RUNTIME)
@Documented
@Constraint(
validatedBy = {IsMobileValidator.class}
)
public @interface IsMobile {
boolean required() default true;
String message() default "手机号码格式错误";
Class<?>[] groups() default {};
Class<? extends Payload>[] payload() default {};
}
123456789101112131415161718
|
@Target:表示的是能够标注的范围@Constraint:这个注解帮助我们处理逻辑,其中有IsMobileValidator.class是真正处理逻辑的类,我们看看它的代码
1
2
3
4
5
6
7
8
9
10
11
12
13
14
15
16
17
18
19
20
21
22
23
24
25
26
27
| public class IsMobileValidator implements ConstraintValidator<IsMobile, String> {
private boolean required = false;
@Override
public boolean isValid(String s, ConstraintValidatorContext constraintValidatorContext) {
if(required){
return ValidatorUtil.isMobile(s);
}else {
if(StringUtils.isEmpty(s)){
return true;
}else {
return ValidatorUtil.isMobile(s);
}
}
}
@Override
public void initialize(IsMobile constraintAnnotation) {
required = constraintAnnotation.required();
}
}
1234567891011121314151617181920212223242526
|
- 先看类的声明部分,public class IsMobileValidator implements
ConstraintValidator,它有两个泛型,第一个是自定义的注解类,第二个是要验证的参数类型,另外实现该接口的逻辑类,被spring管理成bean,可以在需要的地方进行装配
- 其中有一个
initialize,初始化方法,它调用的是我们自定义注解中写的required()方法,默认需要有值
- 另一个方法
isValid,则对逻辑进行验证,true验证通过,false验证失败
5. 全局异常处理器
5.1 我们为什么要引入全局异常处理器?
1
2
3
4
5
6
7
8
9
10
11
12
13
14
15
16
17
18
19
20
21
22
23
24
| public CodeMsg login(LoginVo loginVo){
if(loginVo == null){
return CodeMsg.SERVER_ERROR;
}
String mobile = loginVo.getMobile();
String password = loginVo.getPassword();
MiaoShaUser user = getById(Long.parseLong(mobile));
if(user == null){
return CodeMsg.MOBILE_NOT_EXIST;
}
String DBPass = user.getPassword();
String formPassToDBPass = MD5Util.formPassToDBPass(password, user.getSalt());
if(!formPassToDBPass.equals(DBPass)){
return CodeMsg.PASSWORD_ERROR;
}
return CodeMsg.SUCCESS;
}
1234567891011121314151617181920212223
|
它的返回值是CodeMsg,而在业务中,方法对应的返回值应该是确切的,我们登陆,返回应该为 true 或 false,所以,我们要对这里进行优化
5.2 优化
代码如下
1
2
3
4
5
6
7
8
9
10
11
12
13
14
15
16
17
18
19
20
21
22
23
24
| public boolean login(LoginVo loginVo){
if(loginVo == null){
throw new GlobalException(CodeMsg.SERVER_ERROR);
}
String mobile = loginVo.getMobile();
String password = loginVo.getPassword();
MiaoShaUser user = getById(Long.parseLong(mobile));
if(user == null){
throw new GlobalException(CodeMsg.MOBILE_NOT_EXIST);
}
String DBPass = user.getPassword();
String formPassToDBPass = MD5Util.formPassToDBPass(password, user.getSalt());
if(!formPassToDBPass.equals(DBPass)){
throw new GlobalException(CodeMsg.PASSWORD_ERROR);
}
return true;
}
1234567891011121314151617181920212223
|
我们可以发现,对应的参数验证,并没有返回值,而是直接抛出异常,而且我们也将返回值进行了修改,执行到方法的最后,能够返回ture
5.3 全局异常
1
2
3
4
5
6
7
8
9
10
11
12
| public class GlobalException extends RuntimeException {
private CodeMsg codeMsg;
public GlobalException(CodeMsg codeMsg){
this.codeMsg = codeMsg;
}
public CodeMsg getCodeMsg() {
return codeMsg;
}
}
1234567891011
|
- 全局异常就比较简单了,它
继承了RuntimeException类,其中包含我们需要返回的信息CodeMsg的字段
5.4 全局异常处理器
这个处理器可就值得说一说了!
1
2
3
4
5
6
7
8
9
10
11
12
13
14
15
16
17
18
19
20
21
22
23
24
25
26
| @ControllerAdvice
@ResponseBody
public class GlobalExceptionHandler {
@ExceptionHandler(value = Exception.class)
public Result<String> exceptionHandler(HttpServletRequest request,Exception e){
if(e instanceof GlobalException){
GlobalException ge = (GlobalException) e;
CodeMsg codeMsg = ge.getCodeMsg();
return Result.error(codeMsg);
} else if(e instanceof BindException){
BindException be = (BindException) e;
List<ObjectError> allErrors = be.getAllErrors();
ObjectError error = allErrors.get(0);
String message = error.getDefaultMessage();
return Result.error(CodeMsg.BIND_ERROR.fillArgs(message));
}else {
return Result.error(CodeMsg.SERVER_ERROR);
}
}
}
12345678910111213141516171819202122232425
|
@ControllerAdvice:它是增强的Controller,能够实现全局异常处理和全局数据绑定- 配合
@ExceptionHandler(value = Exception.class),它能够实现对所有异常的接受,而在方法中,对不同的异常进行处理
6. 关注一下参数替换的方法
1
2
3
4
5
6
7
8
| public static CodeMsg BIND_ERROR = new CodeMsg(500101,"参数校验异常:%s");
public CodeMsg fillArgs(Object... args){
int code = this.code;
String message = String.format(this.msg, args);
return new CodeMsg(code,message);
}
1234567
|
- 其中
String.format()能够根据传入的字符串格式,比如”参数校验异常:%s”,其中%s,能被第二个传入的参数进行替换,从而形成动态的字符串